In short
The MyParcel plugin connects your WooCommerce shop to MyParcel. Customers pick a delivery moment or pickup point in the checkout, you print labels from WordPress, and Track & Trace is sent to the customer automatically. No code needed — everything runs from the WordPress admin.
Quickstart — your first parcel in 15 minutes
Enough to ship your first real order today. For deeper configuration, see Looking for… below.
- Account. Don't have a MyParcel account yet? Create one at myparcel.nl/register.
- Copy the API key. Log in to backoffice.myparcel.nl → Shop settings → Integration → copy the API key.
- Install the plugin. In WordPress: Plugins → Add new plugin → search MyParcel → Install now → Activate.
- Connect the plugin. Open WooCommerce → MyParcel, click Change API key, paste the key and click Save. The status badge should show Connected to MyParcel.
- First label. Open a paid order, scroll to the MyParcel block and click Export and print. Your PDF label rolls out.
You're done when you see this
- At the top of the plugin: a green Connected to MyParcel status
- You can export a test order to MyParcel
- Your PDF label opens (or lands in your downloads folder)
Looking for…
| What do you want to do? | Go to |
|---|---|
| First-time setup | Quickstart |
| Recommended settings for your type of shop | 4 · Which shop profile are you? |
| Look up a specific setting | 5 · Settings · Orders to 9 · Settings · Carriers |
| A different setting per product | 10 · Product settings |
| What the customer sees in the checkout | 13 · The checkout experience |
| Bulk processing for 50+ orders/day | 14 · Daily use |
| Something's not working | 15 · Something's not working — diagnostics |
| Answer to a frequently asked question | 16 · FAQ |
1 · Preparing your MyParcel account
Before you start in WooCommerce, take care of four things in your MyParcel backoffice:
- Billing and return address — Shop settings → General. This appears on every label.
- Activate carriers — Shop settings → Carriers. Only enabled carriers appear in the plugin later.
- Generate an API key — Shop settings → Integration.
- Import order information (optional) — turn on if you want to use order mode.
2 · Installing the plugin
- In the WordPress admin: Plugins → Add new plugin.
- Search MyParcel.
- Find WooCommerce MyParcel and click Install now, then Activate.
- A new menu item WooCommerce → MyParcel appears.
Prefer to install manually?
Download the release ZIP from github.com/myparcelnl/woocommerce/releases and upload it via Plugins → Add new plugin → Upload plugin.
3 · Connecting the plugin (API key)
Open WooCommerce → MyParcel. At the top you'll see three buttons — Change API key, Change webhooks, Debug options — plus the status badge.
 The connection bar appears on every plugin page.
- Click Change API key.
- Paste the key from your MyParcel backoffice.
- Click Save — within seconds the status switches to Connected to MyParcel.
Not working?
Most common causes: didn't click Save · a space copied before/after the key · key from a different shop · plugin runs on a different environment (live vs sandbox) than your MyParcel account.
What does the plugin do in your WordPress admin?
| Where? | What can you do? |
|---|---|
| WooCommerce → MyParcel | Settings page with five tabs (Orders, Labels, Customs, Checkout, Carriers). |
| WooCommerce → Orders | Extra MyParcel column per order + bulk actions for exporting & printing. |
| Order detail page | MyParcel box to set carrier/package type/insurance per order and create labels. |
| Product detail page | MyParcel tab in Product data for product-specific settings. |
4 · Which shop profile are you?
Four typical profiles with recommended settings. Pick one, copy the settings, then fine-tune via 5 · Settings.
Small — a few orders per day, NL only
| Setting | Recommended | Why |
|---|---|---|
| Order mode | On | Full order to MyParcel |
| Concept shipments | On | Keeps you in control while you learn |
| Auto-process | None | Click Export yourself per order |
| Label format | A4 (4 per page) | No label printer needed |
| PostNL only | On | Standard NL carrier |
| Insurance — Insure from € | 250 | Parcels above €250 are insured automatically |
Busy shop — 50+ orders/day
| Setting | Recommended | Why |
|---|---|---|
| Concept shipments | Off | Faster — labels are final immediately |
| Auto-process | Processing | No more clicking per order |
| Label format | A6 (Zebra/Brother label printer) | Faster printing |
| Print immediately | On | Print flow without clicks |
| Bulk export | 2–3× per day | From the order list |
| Processing time | 2 days during peaks | Realistic window for the customer |
| PostNL + DHL For You | Both on | Broad coverage |
Mailbox-only — coffee, cards, cosmetics
| Setting | Recommended | Why |
|---|---|---|
Shipping class Mailbox | Create in WooCommerce → Shipping → Shipping classes | Link products to it |
| Checkout → Allowed shipping methods | Method → Mailbox parcel | One method per package type |
| Show delivery options | Off | No time slot for mailbox |
| Insurance | Off | Not available for mailbox parcels |
Expensive jewellery / high-value products
| Setting | Recommended | Why |
|---|---|---|
| Default signature | On | The courier asks the customer to sign |
| Default only recipient | On | No neighbours |
| Insurance | From €0, up to €2500, percentage 100% | Full coverage |
| Evening delivery + pickup points | Off | Reduces loss/theft |
| Separate address fields + Address widget | On | Minimises typos |
Shipping internationally
| Setting | Recommended | Why |
|---|---|---|
| Share customer information | On | Phone is required for customs |
| Customs tab | Fill in completely | HS code, country of origin, Goods |
| DHL Parcel Connect | On | For Europe |
| UPS / DHL Express | On | For worldwide |
5 · Settings · Orders
The first and most important tab — this is where you set how orders flow through your shop.
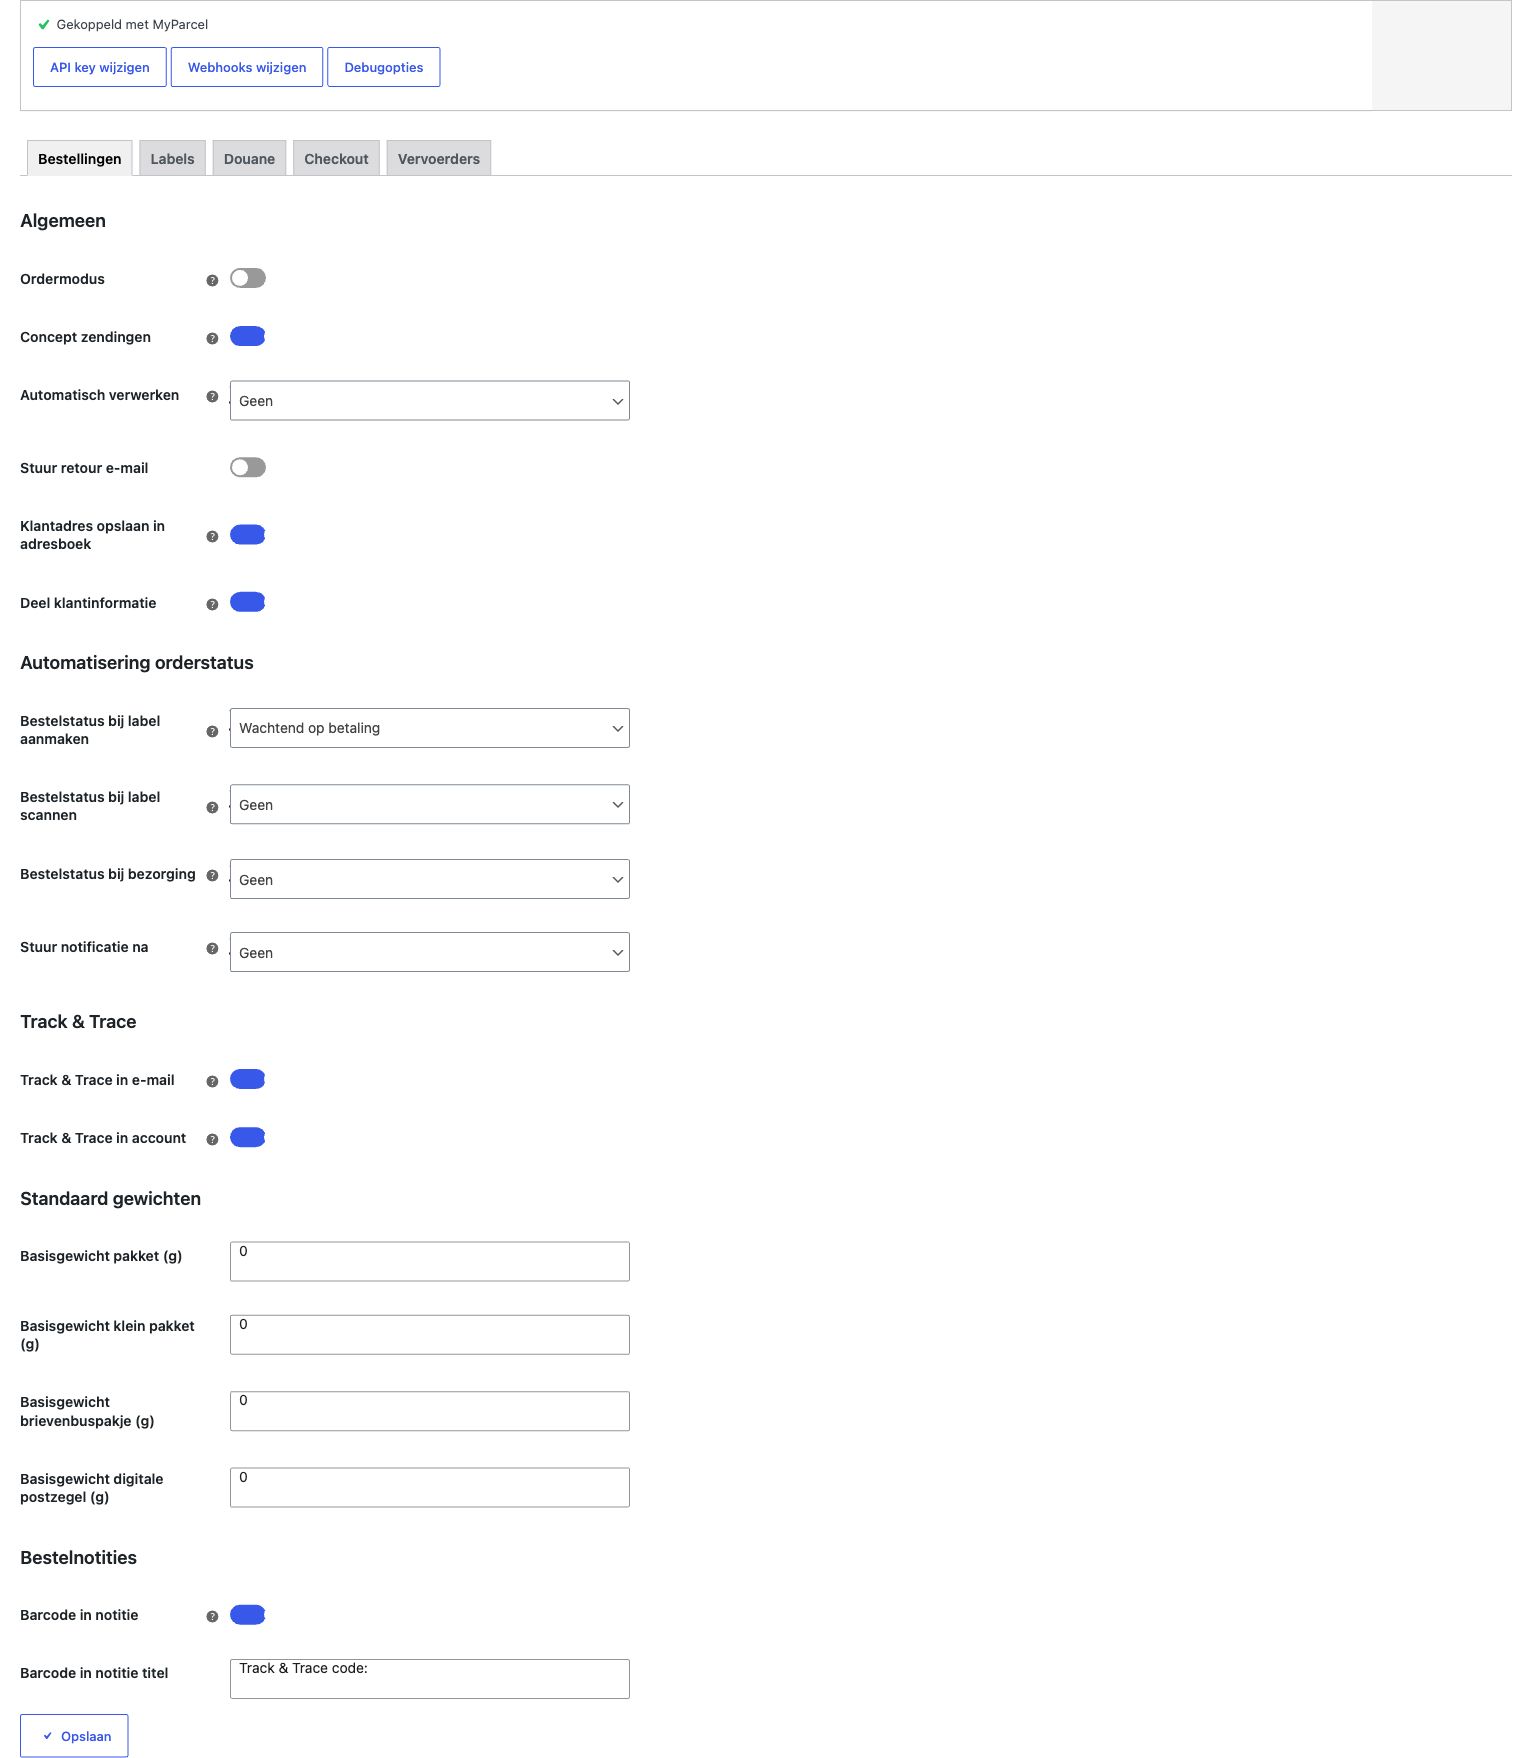
General
- Order mode — On: full order (customer data, line items, notes) to MyParcel. Off: only a label. Recommended on, provided Import order information is also on in MyParcel.
- Concept shipments — On: shipment stays as concept in MyParcel. Off: registered with the carrier directly. On during setup, off once everything runs.
- Auto-process — Which WooCommerce status triggers an automatic export? None / Pending payment / Processing / Completed. Start with None.
- Send return email — The customer automatically receives a return link. Recommended for fashion/shoes.
- Save customer address to address book — Addresses end up in your MyParcel address book.
- Share customer information — Email + phone to MyParcel. Required for Track & Trace email and mandatory for international. Recommended on.
Order status automation
Let the WooCommerce order status follow the shipping process automatically.
- Order status when label is created — typically Processing.
- Order status when label is scanned — typically Completed.
- Order status on delivery — Completed (if not earlier).
- Send notification after — which status transition triggers a WooCommerce email.
Track & Trace
- Track & Trace in email — link in the WooCommerce order confirmation. Recommended on.
- Track & Trace in account — link on the customer's My account page.
Default weights
Each package type has an empty weight. MyParcel adds it on top of the product weight.
| Package type | Typical empty weight |
|---|---|
| Parcel (brown box) | 200 – 400 g |
| Small package | 100 – 200 g |
| Mailbox parcel | 50 – 100 g |
| Digital stamp | 10 – 30 g |
Order notes
- Barcode in note — Track & Trace code as an order note.
- Barcode in note title — prefix before the code. Default:
Track & Trace code:.
6 · Settings · Labels
Everything about the label itself — text, format and print behaviour.

Description on the label
Variables are filled in automatically when the label is created:
| Variable | Becomes |
|---|---|
[DELIVERY_DATE] | Delivery date |
[ORDER_ID] | WooCommerce order number |
[PRODUCT_ID] | Product ID |
[PRODUCT_NAME] | Product name |
[PRODUCT_QTY] | Quantity |
[PRODUCT_SKU] | SKU |
[CUSTOMER_NOTE] | Customer note |
Examples: Order [ORDER_ID] · [ORDER_ID] · [PRODUCT_QTY]× [PRODUCT_NAME]
Print behaviour
- Print immediately — show the PDF directly after export.
- Ask label position — ask each time which positions on an A4 sheet to use.
Defaults
- Label output — Open in new tab (print manually via the browser) or Download label.
- Label format — A4 (4 per page) for a standard printer, A6 (label printer) for Zebra/Brother.
7 · Settings · Customs
Required for shipments outside the EU (UK, Switzerland, US, Norway, Canada…). These values appear on the CN22/CN23 form attached to the label.

- Package contents — Goods (default for webshops), Documents, Gift, Commercial sample, Return shipment.
- HS code — harmonised customs code. Look up at tarief.douane.nl. Examples:
6109.10(T-shirts),9503.00(toys),3304.99(make-up). - Country of origin — where the product comes from (not where you store it).
8 · Settings · Checkout
What your customer sees and can choose at checkout.

Address fields
- Use separate address fields — splits Street into Street + Number + Suffix. Recommended on — prevents undeliverable parcels.
- MyParcel Address widget (BETA) — autocomplete for NL postal code + house number.
Delivery options
- Show delivery options — master switch for the checkout widget. Recommended on.
- Show delivery options for backorders — also show for out-of-stock products.
- Position in checkout — After billing address, After shipping address, or After order note.
- Allowed shipping methods — link each WooCommerce shipping method to a package type (Default, Parcel, Small package, Mailbox parcel, Digital stamp, Unfranked). One method = one package type.
- Price type — Included (total price) or Surcharge (only the difference).
- Delivery options title — heading above the widget.
- Custom CSS — your own styling.
Pickup points
- Default view — Map or List.
- Users can switch between list and map — Recommended on.
- Exclude parcel lockers — hide unmanned lockers.
- Closed days — days you don't ship.
9 · Settings · Carriers
Each carrier has its own sub-tab. Which ones appear depends on what you've activated on your MyParcel account.

All carriers are structured the same
Below I walk through PostNL as an example — DHL For You, DHL Parcel Connect, DPD, UPS, GLS and Trunkrs work identically (each with their own specific options).
Default export settings
- Enable age check (18+) — required for alcohol/tobacco.
- Enable signature — courier asks for a signature.
- Enable only recipient — no neighbours.
- Enable direct return — undelivered straight back to you.
- Enable larger than 100 × 70 × 58 cm — large parcels (surcharge).
- Enable tracked / Enable receipt code — extra tracking options.
Insurance
- Enable insurance — master toggle.
- Insure from (€) — threshold amount.
- Insure up to — max coverage NL.
- Insure up to (EU) / (EU + Rest of World) — maximums per region.
- Insure for percentage — e.g. 100% of the order value.
Delivery options — all fields
Home delivery options
- Enable home delivery — master toggle.
- Delivery days window — 1 to 14 days ahead.
- Processing time — working days between order and drop-off.
- Cut-off time — configurable per day.
- Shipping options — tick the days you ship.
Delivery moments
- Standard delivery + standard delivery price.
- Morning delivery + morning delivery price.
- Evening delivery + evening delivery price.
- Monday delivery + Monday delivery price.
Shipping options
- Only recipient + surcharge.
- Signature + surcharge.
- Allow Prio (24 hour) + surcharge — express delivery.
Pickup location options
- Enable pickup locations.
- Pickup price — positive = surcharge, negative = discount.
Don't forget to save
Always click Save at the bottom of each carrier tab before switching to another tab.
10 · Product settings
Every product has an extra MyParcel tab under Product data. Here you override the global settings from Carriers and Customs per product. Each field has a 🔒 lock icon — click it open to detach from the global value.

MyParcel options
- Package type — overrides the default package type for this product.
- In mailbox — how many of this product fit together in one mailbox parcel.
-1= not mailbox. Example: stickers where 50 fit in a mailbox parcel → set50. If a customer orders 51, the order automatically becomes a Parcel.
Product delivery options
- Delay shipping — extra working days before this product can leave. For made-to-order, external warehouses, etc.
- Disable shipping options — hides the entire MyParcel delivery widget at checkout when this product is in the cart. For virtual products or gift cards.
- Exclude parcel lockers — hides DHL/PostNL parcel lockers as a pickup point for this product.
Product customs options
- Country of origin — more specific than the global value. E.g. globally Netherlands, dropship product China.
- Customs code (HS code) — product-specific HS code.
Product export options (all with lock-override)
- Enable age check (18+) — e.g. for alcohol.
- Enable direct return — undelivered straight back.
- Enable insurance — always insure this product.
- Enable larger than 100 × 70 × 58 cm or heavier than 23 kg — for oversized.
- Enable only recipient / Enable signature / Enable Prio (24 hour).
- Enable tracked / Enable receipt code.
- Fresh delivery / Frozen delivery — for food shops.
The lock icon 🔒
Lock closed = product uses the global setting. Lock open = product-specific value is active.
11 · The orders list
On WooCommerce → Orders the plugin adds a MyParcel column and bulk actions. At a glance, you see whether each order has been created and what status it has.

Bulk actions
Tick orders and pick from the Bulk actions dropdown:
- MyParcel: Export — creates shipments at MyParcel (concept or direct).
- MyParcel: Export & Print — same as above, plus a combined PDF.
Bulk flow for 50+ orders/day
Process all your daily orders in one click. Combine with Auto-process on Processing and the plugin runs almost entirely on its own.
12 · The order detail page
On the detail page of an individual order a MyParcel box appears in which you fine-tune all shipping options for that order.

What's in the box?
- Carrier — radio with all available carriers. MyParcel auto-picks the most suitable one; you can override per order.
- Package type — override for this order (e.g. mailbox parcel for a small order).
- Delivery method — Standard delivery or Pickup at a pickup point.
- Number of labels — split a large order across multiple parcels? Set
2or3. - Insurance — override the global rules for this order.
- Saturday delivery / Signature required — toggles with lock.
The four action buttons
- Save — stores settings without registering the shipment.
- Export — registers the shipment with MyParcel. Generates a barcode.
- Print — prints the label of an already exported shipment.
- Export and print — everything in one click.
The Labels table at the bottom of the box
Once an order has been exported, a table with all labels appears below the buttons.

Actions dropdown per label
Reprint label · Generate return label · Cancel shipment (only possible while the parcel hasn't been scanned by the carrier yet).
13 · The checkout experience
What your customer sees once the delivery address is filled in — appears as soon as at least one carrier is enabled and the WooCommerce shipping method is linked to a MyParcel package type (§8).
The customer picks a carrier and delivery moment from a date carousel, a time slot and optional extra options (signature, only recipient). Below home delivery, a Pickup at a pickup location block appears with an interactive map, opening hours and a list/map toggle.
14 · Daily use
Workflow 1 — per order
- Open WooCommerce → Orders and click an order.
- At the bottom: the MyParcel box → choose carrier, package type, etc.
- Click Export and print.
- The PDF opens or downloads — stick the label on the box.
Workflow 2 — bulk (10+ orders/day)
- From the order list, tick orders.
- Bulk actions → MyParcel: Export & Print.
- Click Apply. One combined PDF with all labels.
When you're billed
You're only billed once a shipment is actually handed over to the carrier. Digital stamps are the exception — they are charged immediately on export.
Returns
Three ways, from most to least automated:
- Automatic return email — Orders → General → Send return email on. With every export the customer receives a return link.
- Manual return label — in the MyParcel box on the order, choose Generate return. Send the label to the customer yourself.
- Return portal — enable in your MyParcel backoffice. The customer goes to a URL, enters the order number, and gets a label instantly.
15 · Something's not working — diagnostics
Something not behaving as expected? Run through this table top to bottom — three out of four issues are fixed within 5 minutes.
| Symptom | What to check |
|---|---|
| No status badge or Not connected | (1) Plugin activated? (2) WooCommerce 7.0+ and PHP 8.1+? (WooCommerce → Status) (3) Server, LiteSpeed/Redis and browser cache cleared? |
| Widget doesn't appear at checkout | (1) §8: Show delivery options on? (2) Each shipping method linked to a package type? (3) Standard shortcode checkout ([woocommerce_checkout])? (4) JS error in browser console (F12)? |
| Labels are not created | (1) Status badge still green? (2) Order has a shipping + customer address? (3) Shipping method present (local pickup doesn't count)? (4) Product weight filled in? (5) Error message on the shipment in the MyParcel backoffice? |
| Track & Trace not in the email | (1) §5: Track & Trace in email on? (2) Order already exported? Without a barcode there's no link. (3) Mail sent? (WooCommerce → Status → Logs) (4) Customer's spam folder? |
| Wrong address on the label | (1) Turn on Use separate address fields (§8). (2) Use the MyParcel Address widget for NL. (3) The label shows the Shipping address, not the billing address. |
| Everything becomes Parcel, never Mailbox | (1) §8: the mailbox method shouldn't also sit under Parcel. (2) One shipping method = one package type. (3) Use shipping classes to link products to package types. |
| Conflict with another plugin | Deactivate other shipping/checkout plugins one by one to isolate. Postal-code-checker plugins can split street/number fields that MyParcel expects. |
16 · FAQ
Does the plugin cost money?
No. You only pay for the shipments via MyParcel.
Can I link two MyParcel accounts to a single WooCommerce shop?
Not out of the box — one API key per shop. For two brands: run two separate WooCommerce shops.
How do I change the sender address on the label?
That's set in your MyParcel backoffice (Shop settings → General → Address details), not in the plugin. Changes apply immediately.
Which statuses for "Auto-process"?
Mollie/iDEAL? Orders go straight to Processing. Bank transfer and manual processing? Completed.
Can I print more than 4 labels per A4?
No — A4 is always 4 per page. Consider an A6 label printer at 20+ orders/day.
Does it work with Afterpay/Klarna?
Yes — MyParcel is independent from your payment provider.
Customer picks a pickup point — how do I see it on the label?
The pickup point is sent as the recipient address to MyParcel automatically.
Evening delivery isn't visible for some addresses
Address-dependent — determined by the carrier, not the plugin.
I see duplicate DPD tabs
Not a bug — MyParcel distinguishes two DPD contracts. Only enable your active contract.
Can I have parcels picked up by the carrier?
Yes — under Carriers → [carrier] → Enable carrier pickup.
I updated the plugin and now something isn't working
Roll back via WP Rollback or the GitHub release. Report the bug at github.com/myparcelnl/woocommerce/issues.
Resources & support
- github.com/myparcelnl/woocommerce ↗ — source code, releases, issues.
- wordpress.org/plugins/woocommerce-myparcel ↗ — plugin listing.
- backoffice.myparcel.nl ↗ — account, API key, billing.
- Contact MyParcel support — 023 - 30 30 315 · info@myparcel.nl.